Pages

Showing posts with label thanksgiving. Show all posts

Wednesday, November 5, 2014

Welcome to Fall


Last week I worked with my husband to make this cute little yard sign.  "Give Thanks and Be Grateful."  I thought it was a perfect message for fall and Thanksgiving.  I may even put greenery around it after Thanksgiving too.  Who knows!


I hand painted the sign with acrylic paint and it has faired very well through a very rainy week!
  

Saturday, November 1, 2014

November!

I always feel old when time moves by too quickly.  It's been an amazing fall this year with great weather and many blessings!  I'm ready for the Thankful/Grateful season of November.

Here is a fall themed table scape I did the other day.


My napkins are folded and sitting up in a wire basket that I found in the Target $ spot area.  It was $3!  I feel particularly proud of that this year.  


My favorite part was using my tree slices as a charger.  I used these tree slices as part of centerpieces for my wedding (4 years ago!!) and now they are spread throughout the house with all kinds of things like vases and candles on top of them.


I also always like to add different heights of interest at a table.  So I turned my brass bowl upside down and set up a dessert plate on top.


I love mixing grey/tans/browns/gold/silver tones together.  I think it makes for a warm comforting feeling.

If you like the printable table decorations you can find them in my etsy shop!  They are so easy to use, you can print them at home and just write names or sweet messages on them and add that extra finish to your fall or Thanksgiving table!

Wednesday, October 29, 2014

Fall Paper Goods


During my watercolor painting kick I got inspired and started to mix all of these fun fall colors.  There is an artist that I admire who is always sketching with black ink and then going back in to paint with watercolors.  I wanted to try out some of her method here.  I came up with some fall party paper goods with geometric shapes and a floral design.
Above are some food labels.  I just cut inside the gray lines and fold them over in the center.  This way your labels can be double sided and you can mix and match the floral with the geometric sides.

I always cut inside the gray outline here and tape two together with a toothpick in between as another food label.  Or you can hole punch it once at the top and another at the bottom and insert a straw and use it as a name tag for drinks!

Of course I had to have two different options for cupcake wrappers.  The background is a natural watercolor paper texture to give some interest to the fall or thanksgiving table scape.  To print off your own high quality pictures you can purchase them at my etsy site here.

Wednesday, November 20, 2013

Kids' Table: Paper Turkey and Flowers


 Even though the kids get paper napkins instead of fabric ones doesn't mean that I couldn't fold it in a fun way to make the dinner a little more special.  I folded two paper napkins into a turkey!  I based it off of this youtube video.  The only thing I did differently was for the body of the turkey.  I kept the paper napkin folded in fourths and then folded the body of it.


I made the circular flowers based on something like this video.  The only difference is in the weird glue she has, I use a hot glue gun.  It gets the job done quickly.


This flower is made from coffee filters.  I made it based on this video, except I stopped half way.  I liked the way they looked white and crisp with the rest of the paper decor on my table.  I'll probably paint and finish them at a later time.

Tuesday, November 19, 2013

Kids' Table: Place Card


The placecards are actually crayon packets!


All you need to do is pull the ribbon and open up the packet of crayons!


And so the kiddos can use the crayons to color on almost anything on the table, except the table itself of course!


Here is how I did it!
Step 1:  Cut a 5.5"x7" rectangle out of the grocery bag.
Step 2:  Use rubber cement to glue on curly ribbon just off center of the rectangle.  Be sure to leave a little extra at the top so they can pull it.
Step 3:  Find 8 crayons (everybody has that box of crayons around, no need to buy new ones.  Kids don't care.) and wrap the paper around the crayons.  
Step 4:  Glue the package closed with rubber cement.
Step 5:  Tie off the ends with twine.


Monday, November 18, 2013

Kids' Table: Placemats

I have to admit that this post is inspired by my parents.  That is, I still sit at the 'kid table' which ranges from 2-40 and has two generations.  Last year my parents made it a lot more fun.  They used craft paper as a tablecloth and used sharpie to outline our place settings.  There were crayons in the middle of the table and we all colored on our 'plates'.  


I decided to make a table setting with only things I had around the house.  Including several paper grocery bags.  I wanted to make it all kid friendly and entertaining for the little ones.


I could make two placemats out of one grocery bag.  
Step 1:  Take off the handles of the grocery bag.
Step 2:  Cut along the length of the bag and cut the bottom off.
Step 3:  Cut the remaining rectangle in half for 2 placemats.
I kept the pinked top edge of the bag as the top of the placemat because I liked that look.


I painted 'thankful' on the top of all of the placemats.  I simply used watered down black puff paint because I was out of any acrylic paint!

Tuesday, November 12, 2013

Table Setting Thanksgiving

Now that you've seen my Thanksgiving tablescape, I wanted to show you my table setting...
When I got married I chose very simple white square plates.  I knew that they would be my blank canvas to show off delicious food and they would easily go with any occasion. 

Here I put our brown patterned napkins in the center of the plates with gold pumpkins and gourds as name place card holders.  

That's right, I just spray painted the orange and fall colored pumpkins/gourds I had for Halloween.  It was quick and easy.  I love the way they turned out.

 I love that I can mix and match other dishes with my simple white ones as well.  Notice my little appetizer plates I used under the place card holders.  They have an embossed pattern and black edges.

I mixed a lot of different neutrals in my centerpiece and place settings.  I just went with it!  Sometimes you just have to go for it and see if it works.  In this case I mixed white, tan, grey, browns, silver, gold, taupe and a touch of black.  It's just a jumble of soft neutrals and it works! Don't get hung up on matching colors!


Monday, November 11, 2013

November Tablescape


This year after Halloween I changed my tablescape to a more neutral Thanksgiving themed table.  I had picked up a grey Cinderella pumpkin and used that as my focal piece.  It is sitting on a tree slice covered in moss.  I have these scattered around the house.  They are great bases for any decorative object.


The pinecone candlesticks are the same ones that I used earlier.  Now the gold shimmer is more prevalant in this look.


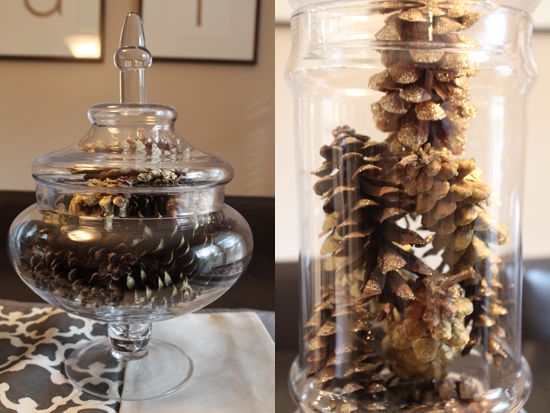
In my large apothecary jars I gathered the painted pinecones I had around the house.  All the pinecones are found in my yard.  Some are spray painted gold and others have gold glitter on the tips.
I love the mix of the grey table runner and all of the taupe and gold.  These are my favorite home decor colors.